
The Guitarist’s Essential Guide: Mastering the Capo and Beyond
What is a Capo?
Despite the name, a capo isn’t a “trigger-happy” Mafia boss. The word actually stems from the Italian capotasto, meaning “head of the fingerboard.”
In practice, a capo is a small, indispensable device that clamps onto the neck of a stringed instrument. By holding down the strings at a specific fret—the metal ridges that divide the guitar neck into musical intervals—it effectively shortens the strings and raises the instrument’s pitch.
Why Every Guitarist Needs One
Whether you’re a beginner or a pro, the capo is a “problem-solver” for two main reasons:
-
Vocal Range: If a song is too low for your voice, you can slide the capo up the neck to find a key that fits your range perfectly without changing your finger shapes.
-
Playability: Some keys are notoriously difficult to play with “open” chords. A capo allows you to use easy shapes (like G or C) to play in complex keys like B-flat or E-flat.

Common Types of Capos
-
Elastic: The most affordable and common entry-point, though they can lose tension over time.
-
Spring-Loaded (Trigger): Fast to move with one hand; great for live performances.
-
C-Clamp (Screw-on): Highly reliable and applies even pressure, reducing the chance of the guitar going out of tune.
-
Specialty (Third Hand): These allow you to clamp only specific strings, opening the door to experimental “open tunings.”
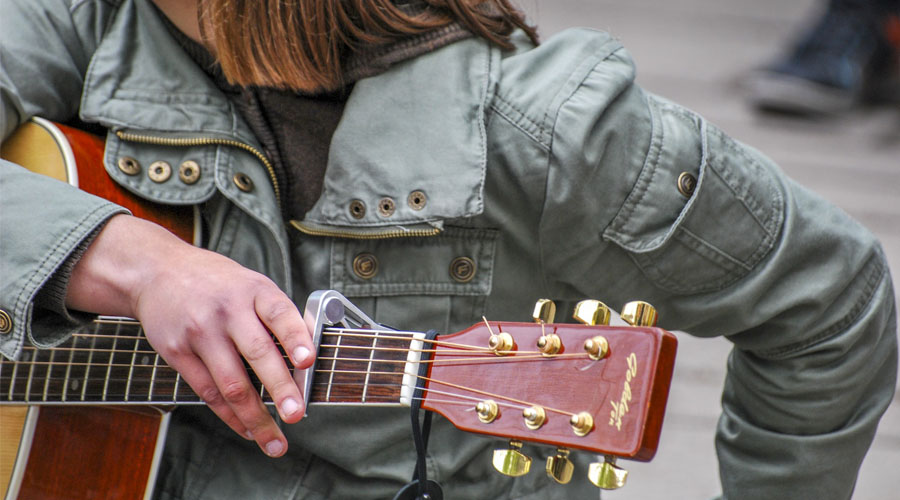
Pro-Tip: When attaching a capo, place it just behind the fret wire. Check for any string “pulling” or stretching, as uneven pressure can make your guitar sound sharp or out of tune.
The “Must-Have” Toolkit
Beyond the capo, every guitarist should keep these three essentials in their gig bag:
-
Extra Strings: Strings always seem to snap at the worst possible moment. Even if they don’t break, aim to change them every two months (or more often if you play daily) to maintain a bright, clear tone.
-
Picks (Plectrums): These are notoriously easy to lose. While you can carve a makeshift pick out of hard plastic in an emergency, nothing beats the feel and response of a professional pick. Stock up!
-
Electronic Tuner: For beginners, an electronic tuner is vital. It removes the guesswork, allowing you to focus on your technique rather than struggling to hear if you’re in tune.
Buying and Maintaining Your Gear
If you are just starting out, here is how to ensure your instrument stays in peak condition:
-
The “Action” Check: When buying a guitar, look for “low action”—meaning the strings are close to the fretboard. This makes the instrument much easier and more comfortable to play.
-
Clean Hands, Clean Strings: Always wash and dry your hands before playing. The oils and sweat from your skin are the primary causes of string rust and grime buildup.
-
Environment Matters: Wood is sensitive. Keep your guitar in a quality case and avoid storing it in places with extreme temperature swings or high humidity.
Would you like me to create a quick “cheat sheet” table showing which capo positions correspond to different musical keys?
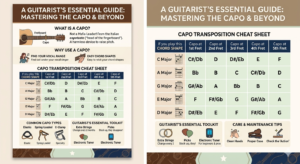
Capo Transposition Cheat Sheet
This table shows how the “shape” of the chord you play changes into a new key (the actual sound) based on which fret you place the capo.
| If you play this Chord Shape | Capo at 1st Fret | Capo at 2nd Fret | Capo at 3rd Fret | Capo at 4th Fret | Capo at 5th Fret |
| C Major | C# / Db | D | D# / Eb | E | F |
| A Major | Bb | B | C | C# / Db | D |
| G Major | G# / Ab | A | Bb | B | C |
| E Major | F | F# / Gb | G | G# / Ab | A |
| D Major | D# / Eb | E | F | F# / Gb | G |
How to Use This Table
-
To Raise the Pitch: If a song feels a little too low for your voice while playing a G chord, put the capo on the 2nd fret. Now, play that same G shape—it will sound like an A major chord, which is higher and might fit your voice better.
-
To Avoid “Barre” Chords: If a song is in the key of Bb (which usually requires difficult finger-barring), put the capo on the 1st fret and play an A shape. It sounds like Bb but feels much easier on your hands.
Quick Tips for Success
-
Tune Twice: Always check your tuning after you put the capo on. The pressure can pull the strings slightly sharp.
-
The “Rule of Two”: Moving the capo up two frets raises the music by one full musical step (e.g., from C to D).
-
Don’t Go Too High: Generally, capos sound best between the 1st and 5th frets. Placing it much higher can make the guitar sound thin or “plucky,” similar to a mandolin or ukulele.
Since you’re working on this guide, would you like me to generate a clean, professional PDF layout or a flyer design for it?